Table of Contents
The Balanced Treats Promise: Dessert Without Compromise
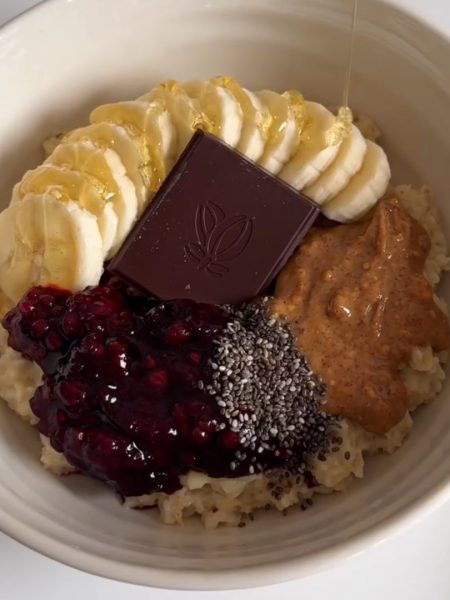
Craving the iconic combination of peanut butter and chocolate but want to skip the refined sugar and artificial ingredients? These homemade peanut butter cups deliver all the indulgent flavor of your favorite candy with a wholesome twist. Made with just a handful of real ingredients—including banana for natural sweetness—this 3 ingredient peanut butter cups recipe proves that treating yourself doesn’t mean compromising your health goals.
At Balanced Treats, we believe every dessert should be healthy, quick, affordable, and absolutely delicious. This healthy Reese’s cups recipe checks all four boxes, transforming a classic candy into a guilt-free treat you can feel good about enjoying (and sharing with your family).
Why This Is the Perfect Balanced Treat
These homemade peanut butter cups embody everything we stand for:
- Healthy: Made with antioxidant-rich dark chocolate, protein-packed peanut butter, and potassium-rich banana instead of refined sugars and artificial flavors. Each cup contains 4g of protein and heart-healthy fats.
- Quick: Just 15 minutes of active prep time! Simply layer, melt, pour, and chill. No baking skills required, making this the ultimate quick fix dessert.
- Affordable: With just 5 simple ingredients that cost under $10 total, you’ll make 12 cups for a fraction of what you’d spend on store-bought candy.
- Delicious: The creamy peanut butter, sweet banana, and rich dark chocolate create an indulgent flavor combination that rivals (and honestly surpasses) any packaged version.
Key Healthy Swaps & Ingredient Wisdom
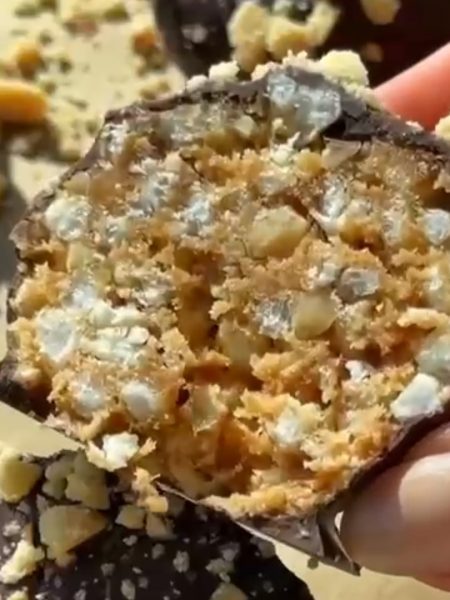
Dark Chocolate Instead of Milk Chocolate
We’re using dark chocolate (70% cacao or higher) as the star of these homemade peanut butter cups. According to research from Harvard T.H. Chan School of Public Health, dark chocolate contains powerful antioxidants called flavonoids that support heart health and reduce inflammation. Unlike milk chocolate loaded with added sugars, dark chocolate offers genuine nutritional benefits while delivering that deep, satisfying chocolate flavor.
Banana for Natural Sweetness
The secret ingredient in this healthy Reese’s cups recipe? Banana! This naturally sweet fruit eliminates the need for added sugar while contributing essential nutrients like potassium, vitamin B6, and fiber. The banana layer adds a creamy texture that perfectly complements the peanut butter, creating a more complex and interesting flavor profile than traditional peanut butter cups.
Coconut Oil for the Perfect Texture
A small amount of coconut oil helps the chocolate melt smoothly and creates that signature “snap” when you bite into these 3 ingredient peanut butter cups. It also contains medium-chain triglycerides (MCTs), which are easily digested and may support energy metabolism.
How to Make the Best Homemade Peanut Butter Cups
Making these homemade peanut butter cups is incredibly simple—even if you’ve never made candy before. Here’s how to create your own healthier version of this beloved treat:
Setting Up for Success
Start by lining a standard 12-cup muffin pan with paper liners. This ensures easy removal and gives your healthy Reese’s cups that classic shape. Having everything prepped before you begin makes the assembly process smooth and stress-free.
Building the Layers
Slice your banana into 12 even coins, about 1/4 to 1/2 inch thick. Consistency here matters—uniform slices ensure each cup has the same perfect peanut butter-to-banana-to-chocolate ratio. Spoon approximately 1 tablespoon of creamy peanut butter into the bottom of each liner, then press one banana slice gently on top. The peanut butter acts as both a flavorful base and an adhesive that keeps everything in place.
The Chocolate Coating
Combine your dark chocolate chips with 1-2 teaspoons of coconut oil in a microwave-safe bowl. Heat in 30-second intervals, stirring thoroughly between each burst until the mixture is completely smooth and glossy. This gentle melting method prevents the chocolate from seizing or burning, which can happen with prolonged high heat.
Pour the melted chocolate over each banana-topped peanut butter base, making sure to completely cover the banana slice and seal the edges. A gentle tap of the muffin pan on the counter helps release any air bubbles and creates a smooth top surface. If you’re feeling fancy, sprinkle a pinch of flaky sea salt over each cup—the salt enhances the chocolate’s flavor and adds a gourmet touch to these 3 ingredient peanut butter cups.
The Waiting Game
Transfer your pan to the refrigerator and let the cups chill for at least 1-2 hours, or until the chocolate is completely firm to the touch. This chilling time allows the chocolate to set properly, creating that satisfying snap when you bite in. The result? Homemade peanut butter cups that look bakery-perfect and taste even better than the original.
More No-Bake Chocolate Treats You’ll Love
If you’re loving these homemade peanut butter cups, you’ll definitely want to try our Puffed Rice Cakes with Chocolate and Almonds. They use a similar no-bake chocolate coating technique but with a crispy puffed rice base that adds an irresistible crunch. Both recipes are perfect for meal prep and storing in the freezer for whenever you need a quick chocolate fix!


Healthy Homemade Peanut Butter Cups
Description
Creamy peanut butter, sweet banana, and rich dark chocolate come together in these easy no-bake cups that taste better than store-bought candy.
Ingredients
Instructions
- Line a 12-cup standard muffin pan with paper liners and set aside.
- Slice the banana into 12 even, coin-shaped pieces, approximately 1/4 to 1/2 inch thick.
- Spoon about 1 tablespoon of peanut butter into the bottom of each lined muffin cup.
- Place one banana slice on top of the peanut butter layer in each cup, pressing down gently.
- Combine the dark chocolate chips and coconut oil in a microwave-safe bowl. Microwave in 30-second intervals, stirring between each interval, until completely melted and smooth.
- Pour the melted chocolate mixture over the banana slice in each cup, ensuring the banana is completely covered and sealed with chocolate.
- If desired, sprinkle a pinch of flaky sea salt over each cup for enhanced flavor.
- Refrigerate for 1-2 hours, or until the chocolate is completely set and firm to the touch.
- Remove the cups from the muffin pan, peel away the paper liners, and enjoy! Store any leftovers in an airtight container in the refrigerator.

Notes
- Storage: Keep in an airtight container in the refrigerator for up to 1 week. These also freeze beautifully for up to 3 months—perfect for meal prep!
- Nut-Free Option: Swap peanut butter for sunflower seed butter or tahini for a nut-free version that’s equally delicious.
- Chocolate Variations: Try milk chocolate or white chocolate for a sweeter version, or mix in chopped nuts, mini chocolate chips, or a drizzle of extra peanut butter before the chocolate sets for added texture.
Nutrition Facts
Servings 12
Serving Size 1 cup
- Amount Per Serving
- Calories
- 180kcal
- % Daily Value *
- Total Fat 12g
- 19%
- Saturated Fat 5g
- 25%
- Sodium 45mg
- 2%
- Total Carbohydrate 16g
- 6%
- Dietary Fiber 2g
- 8%
- Sugars 10g
- Protein 4g
- 8%
* Percent Daily Values are based on a 2,000 calorie diet. Your daily value may be higher or lower depending on your calorie needs.
Your New Favorite Homemade Treat
These homemade peanut butter cups prove that you don’t need a long ingredient list or complicated techniques to create something truly special. With just five simple ingredients and minimal hands-on time, you’ve got a treat that’s perfect for afternoon snacks, post-workout fuel, or whenever your sweet tooth calls.
The best part? You’re nourishing your body with real food ingredients—antioxidant-rich dark chocolate, protein-packed peanut butter, and naturally sweet banana—instead of artificial flavors and excessive refined sugar. Each bite delivers satisfaction without the guilt, which is exactly what balanced eating should feel like.
Make a batch this weekend and store them in your fridge or freezer for whenever a craving strikes. Trust us, once you taste how much better homemade can be, you’ll never go back to the store-bought version.
Ready to make your own?